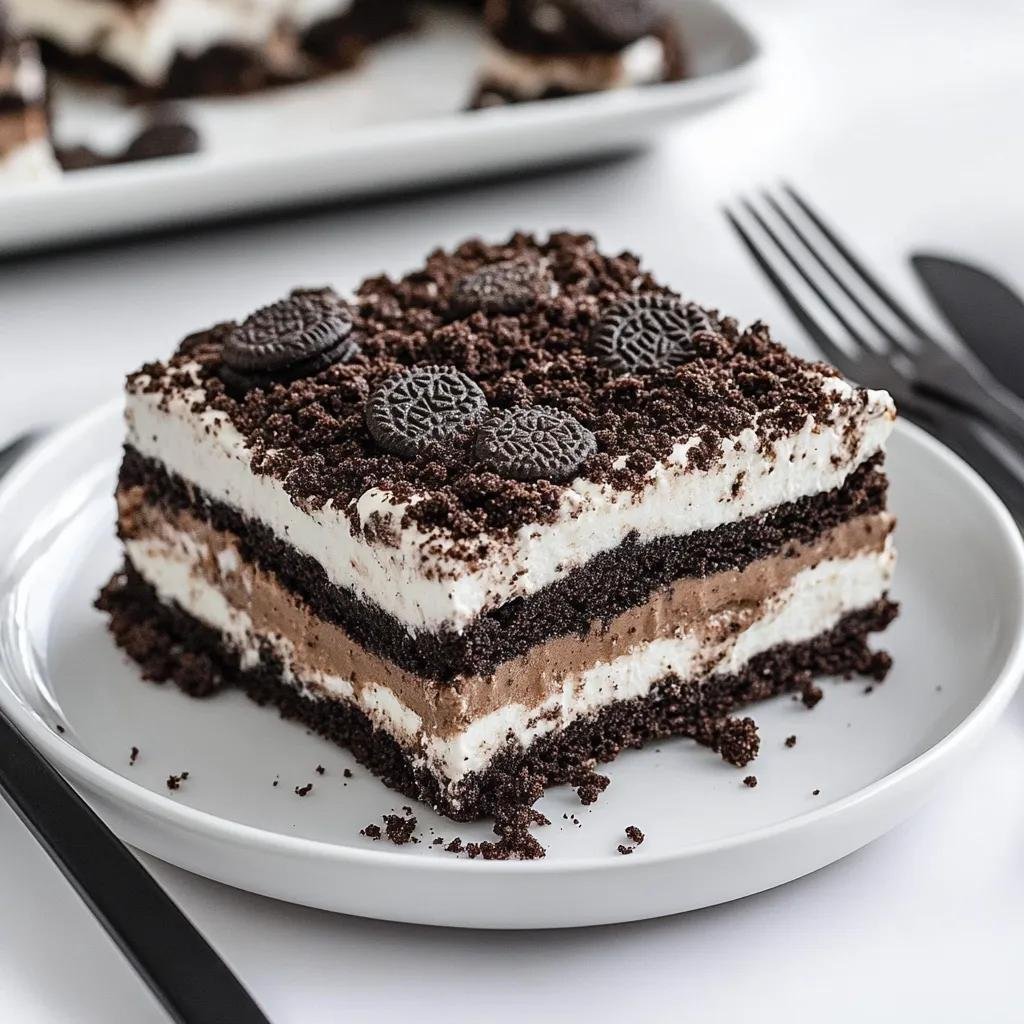
If you’re looking for an easy dessert that doesn’t require turning on the oven, this No-Bake Oreo Dessert is a great choice. It features a buttery Oreo cookie crust, a smooth cream cheese filling, a rich chocolate pudding layer, and a fluffy whipped topping finished with crushed Oreos.
Each layer brings a different texture, from the slightly crunchy cookie base to the soft, creamy filling. It’s an excellent make-ahead dessert for summer gatherings, potlucks, birthdays, holidays, or whenever you need something sweet to share.
The best part? Everything comes together with simple ingredients, and the refrigerator does most of the work.
Recipe Overview
- Prep Time: 25 minutes
- Cook Time: 0 minutes
- Chilling Time: 4 hours
- Total Time: 4 hours 25 minutes
- Servings: 12
- Difficulty: Easy
Why You’ll Love This Recipe
- No oven required: Every layer is prepared without baking, making it convenient when you want an easy dessert.
- Creamy layered texture: The combination of Oreo crumbs, cream cheese, chocolate pudding, and whipped topping creates a satisfying contrast.
- Simple ingredients: Most ingredients are easy to find at a regular grocery store.
- Make-ahead friendly: Prepare it several hours before serving so the layers have enough time to firm up.
- Great for sharing: A 9-by-13-inch dish provides generous portions for parties and family gatherings.
Ingredients
For the Oreo Crust
- 30 Oreo cookies
- 6 tablespoons unsalted butter, melted
For the Cream Cheese Layer
- 1 package (8 ounces) cream cheese, softened
- ¾ cup powdered sugar
- 1 teaspoon vanilla extract
- 1 container (8 ounces) whipped topping, thawed
For the Chocolate Pudding Layer
- 2 packages (3.9 ounces each) instant chocolate pudding mix
- 3 cups cold whole milk
For the Topping
- 1 container (8 ounces) whipped topping, thawed
- 6 Oreo cookies, crushed
Ingredient Notes
Oreo Cookies: Regular Oreo cookies work best for this recipe. Crush them with their cream filling included because it adds sweetness and helps create a flavorful crust.
Cream Cheese: Use full-fat brick-style cream cheese for a smooth, stable filling. Let it soften at room temperature before mixing to prevent lumps.
Whipped Topping: Frozen whipped topping, such as Cool Whip, should be completely thawed before using. It makes the cream cheese layer light and fluffy while helping it hold its shape.
Instant Chocolate Pudding: Choose instant pudding rather than cook-and-serve pudding. Instant pudding thickens with cold milk and doesn’t require stovetop cooking.
Whole Milk: Whole milk gives the chocolate pudding a creamy consistency. Use the amount specified on the recipe card rather than the larger quantity sometimes listed on pudding packages.
How to Make No-Bake Oreo Dessert
1. Prepare the Oreo Crust
Place 30 Oreo cookies in a food processor and pulse until they become fine crumbs. If you don’t have a food processor, put the cookies in a sealed zip-top bag and crush them with a rolling pin.
Transfer the crumbs to a mixing bowl and stir in the melted butter until evenly combined. The mixture should resemble damp sand.
Press the crumbs firmly into the bottom of a 9-by-13-inch baking dish, creating an even layer. Refrigerate for about 10–15 minutes while preparing the filling.
2. Make the Cream Cheese Layer
Place the softened cream cheese in a large mixing bowl. Beat with an electric mixer until smooth and creamy.
Add the powdered sugar and vanilla extract. Continue mixing until everything is fully incorporated and no lumps remain.
Gently fold in the thawed 8-ounce container of whipped topping using a spatula. Mix just until the filling looks light and fluffy.
Spread the cream cheese mixture evenly over the chilled Oreo crust.
3. Prepare the Chocolate Pudding
In a separate bowl, combine the instant chocolate pudding mixes with 3 cups of cold whole milk.
Whisk for approximately 2 minutes, following the pudding package’s instructions, until the mixture begins to thicken.
Let it stand briefly until it reaches a spreadable consistency.
Carefully spread the chocolate pudding over the cream cheese layer, working gently to keep the layers separate.
4. Add the Whipped Topping
Spread the remaining 8-ounce container of thawed whipped topping over the chocolate pudding.
Use an offset spatula or the back of a spoon to create a smooth, even surface.
5. Finish and Chill
Crush the remaining 6 Oreo cookies into small pieces and sprinkle them over the whipped topping.
Cover the dish with plastic wrap and refrigerate for at least 4 hours. For cleaner slices and firmer layers, chilling overnight is even better.
Once set, cut into squares and serve cold.
Expert Tips
- Press the crust firmly: Use the flat bottom of a measuring cup to compact the crumbs. A loose crust can fall apart when serving.
- Soften cream cheese properly: Room-temperature cream cheese blends more smoothly and prevents small lumps in the filling.
- Use cold milk: Cold milk helps instant pudding thicken properly.
- Don’t rush the chilling process: Four hours gives the layers time to firm up. Overnight refrigeration generally makes slicing easier.
- Spread gently: Apply each layer carefully to avoid mixing the cream cheese and pudding together.
- Keep the dessert refrigerated: The dairy-based layers need to remain cold for food safety and the best texture.
Common Mistakes to Avoid
Using too much milk: Adding extra milk can make the pudding layer too soft. Measure the 3 cups carefully.
Skipping the crust chilling time: Spreading the filling over a warm or loose crust can disturb the cookie base.
Using cold cream cheese: Cold cream cheese is harder to blend and may leave lumps in the filling.
Serving too early: Cutting the dessert before it has properly chilled can cause the layers to slide apart.
Using cook-and-serve pudding: This recipe relies on instant pudding, which thickens without cooking.
Easy Variations
- Mint Oreo Dessert: Replace regular Oreos with mint-flavored Oreos for a refreshing chocolate and mint combination.
- Peanut Butter Oreo Dessert: Add ¼ cup creamy peanut butter to the cream cheese mixture for a nutty flavor.
- Golden Oreo Dessert: Use Golden Oreos for the crust and topping, and replace chocolate pudding with instant vanilla pudding.
- Extra Chocolate Version: Sprinkle mini chocolate chips over the whipped topping along with the crushed cookies.
Ingredient Substitutions
- Unsalted butter: Salted butter can be used instead. Simply omit any additional salt.
- Whole milk: 2% milk can work, although the pudding may be slightly less rich.
- Whipped topping: Homemade stabilized whipped cream can replace store-bought whipped topping, but the dessert may have a softer texture and a shorter storage life.
- Chocolate pudding: Instant vanilla pudding can be used for a milder, sweeter flavor.
What to Serve With It
This dessert is rich and creamy, so it pairs nicely with lighter accompaniments.
- Fresh strawberries: Their slight tartness balances the sweetness of the chocolate and cookies.
- Fresh raspberries: A small serving adds a fruity contrast.
- Fresh fruit salad: A refreshing option for summer gatherings.
- Coffee: A cup of black coffee complements the sweet chocolate layers.
- Vanilla ice cream: An option for anyone who wants an extra-cold, creamy dessert.
Storage & Reheating
Refrigerator: Cover the baking dish tightly with plastic wrap or transfer individual portions to airtight containers. Refrigerate for up to 3 days for the best texture and quality.
Freezer: This dessert can be frozen, although the whipped topping and pudding may change texture slightly after thawing. Freeze covered portions in airtight freezer-safe containers for up to 1 month for best quality.
Thawing: Transfer frozen portions to the refrigerator and allow them to thaw before serving. Avoid thawing at room temperature.
Reheating: No reheating is necessary. This dessert is intended to be served chilled.
Frequently Asked Questions
1. Can I make No-Bake Oreo Dessert the day before?
Yes! This dessert is an excellent make-ahead option. Prepare all the layers, cover the dish, and refrigerate overnight. Add the crushed Oreo topping before serving if you prefer a slightly crunchier finish.
2. Why is my Oreo dessert not setting?
The most common reasons are using too much milk, not allowing the pudding to thicken, or cutting the dessert before it has chilled sufficiently. Measure the ingredients carefully and refrigerate for at least 4 hours.
3. Can I use homemade whipped cream instead of Cool Whip?
Yes. Homemade whipped cream can be used, preferably stabilized whipped cream so the layers maintain their structure. The finished dessert may be slightly softer than when made with commercial whipped topping.
4. Do I need to remove the Oreo cream filling before crushing the cookies?
No. Crush the entire cookie, including its cream filling. It contributes sweetness and flavor to the crust.
5. Can I make this dessert without a food processor?
Absolutely. Place the cookies in a sturdy zip-top bag and crush them with a rolling pin until they become fine crumbs. Make sure there are no large pieces in the crust mixture.
6. How do I get clean slices when serving?
Use a sharp knife and wipe it clean between cuts. Make sure the dessert is thoroughly chilled before slicing. A chilled dessert will hold its layers much better.
Final Thoughts
This No-Bake Oreo Dessert is a simple way to turn familiar chocolate sandwich cookies into a chilled, layered treat. With its buttery cookie crust, creamy filling, rich pudding, and fluffy topping, it’s a lovely addition to potlucks, celebrations, and everyday dessert tables.
Prepare it ahead, keep it refrigerated, and serve each slice cold with a little extra crushed Oreo on top.
Leave a Reply